
How to pick a colour from a menu or tooltip that disappears
Menus and tooltips vanish the moment you reach for a picker. The In 3 seconds button in Colour by Zaweba gives you time to open them first.
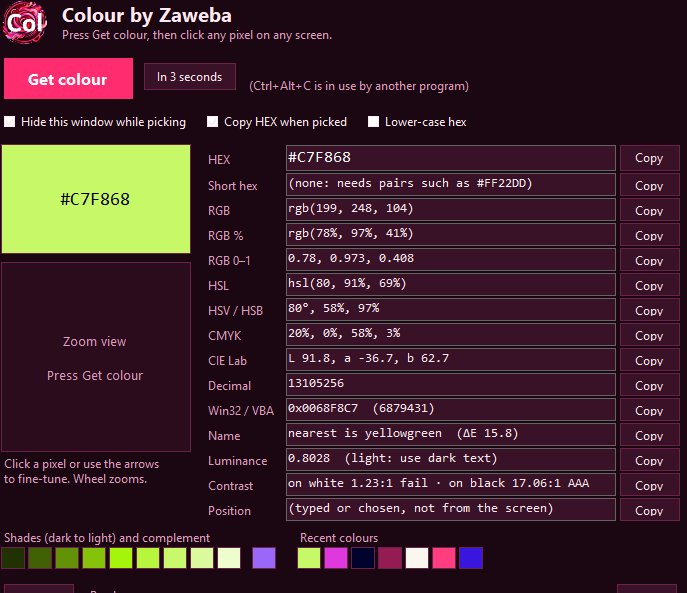
Use the In 3 seconds button in Colour by Zaweba. Press it, open the menu or hover over the thing you want, and wait. After three seconds the screen is frozen with the menu or tooltip still showing, and you can zoom in and click the exact pixel at your leisure.
That is the whole answer, but it helps to know why the ordinary way fails, because once you see it you will reach for the delay without thinking.
Why the colour keeps getting away
Colour works by taking one still picture of your whole desktop, across every monitor, the moment a pick starts. The magnifier then moves over that frozen picture rather than over the live screen. This is what makes it steady: nothing shifts under the pointer while you zoom, and the magnifier can never end up picking its own outline.
The catch is timing. A dropdown menu closes when another window takes the focus. A tooltip fades when the mouse moves away. A button's hover colour only shows while the pointer is resting on it. If you press Get colour, or Ctrl+Alt+C, while one of these is open, the act of starting the picker is often enough to make it disappear, so the frozen picture is taken a fraction of a second too late and shows the plain screen underneath.
Using the three second wait
Open Colour's window and press In 3 seconds. Now go to the program with the menu. Click it open, or rest the pointer over the button or link whose hover colour you need, and keep still. When the three seconds are up, Colour freezes the screen just as it would for a normal pick, except that this time the menu or tooltip is in the picture.
From there everything is the same as any other pick. The magnifier follows the pointer with the chosen pixel boxed and its hex value, RGB value and screen position beside it. Roll the mouse wheel, or press plus and minus, to zoom anywhere from 3x up to 32x. Use the arrow keys to move one pixel at a time, or ten with Shift held. Click, or press Enter or Space, to take the colour. Esc or a right-click cancels if you caught the wrong moment.
Three seconds is not long, so have the menu ready before you press the button. If you need to open a nested submenu, practise the route once so your hand knows where it is going. If you miss, just press In 3 seconds again; nothing is lost.
Getting a clean reading from small text
Menus and tooltips are full of tiny type, and tiny type is mostly edges. The pixels at the edge of a letter are a blend of the text colour and the background, which is why a careless pick gives you a muddy in-between shade. Zoom right in on the frozen picture and choose a pixel from the middle of a thick stroke, or from a flat area of the menu background, not from the fringe.
If you land one pixel out, there is no need to start again. After a pick the main window shows a zoom view of the 81 by 81 pixels around the one you chose. Click a neighbouring pixel in that view, or move with the arrow keys, and the values update. For hover states this is especially welcome, because repeating the three second dance several times gets tedious.
What to do with the colour once you have it
The main window lists the colour in every common format: HEX, short hex, RGB, RGB as percentages and as 0 to 1 fractions, HSL, HSV, CMYK, CIE Lab, decimal and the Win32 COLORREF. Each has its own Copy button, and Copy all puts the lot on the clipboard at once. If you are matching a site's hover colour for your own CSS, copy the hex. If you are noting the colours of a whole menu, picking each item in turn and pasting them into a note is quick.
The nearest CSS colour name and the contrast grades against white and black are there too. Those are handy when the colour you caught is the background of a tooltip and you want to know which text colour will read clearly on it.
Other ways people try
The usual workaround is a screenshot: press Print Screen while the menu is open, paste the picture into an image editor and use its eyedropper. That works, but it is several steps and you end up with a file you did not want. Some pickers simply read the live screen, which avoids the timing problem but brings back the jitter that the frozen picture exists to prevent. The delay keeps the steadiness and still lets you reach things that only appear for a moment.
Colour is a single small file for Windows 10 and 11 with nothing to install, and it never connects to the internet, so you can keep it on hand for exactly this kind of fiddly job.

