
Colour by Zaweba on a Mac and on Linux
Colour by Zaweba has a Mac and Linux version with the same layout and values, using macOS's sampler, its own magnifier on X11 or the Wayland picker.
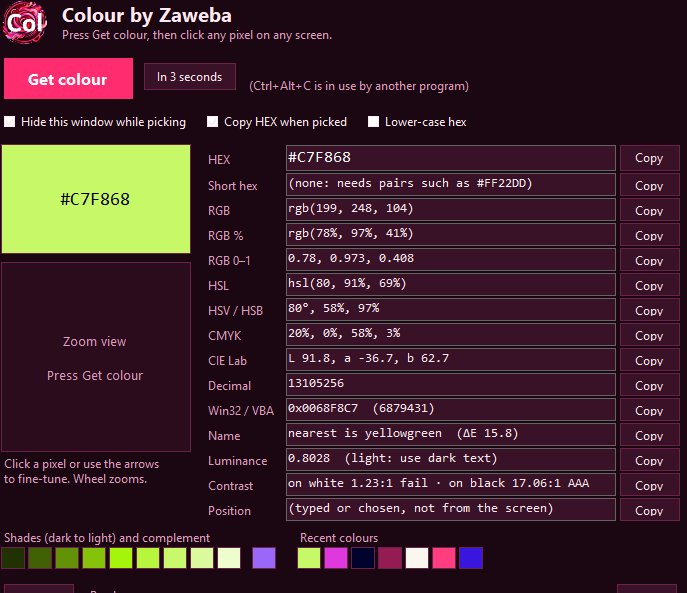
Most of what makes Colour by Zaweba useful on Windows travels with it to other computers. The Mac and Linux version has the same layout and gives the same values, so a colour picked on a MacBook reads out exactly as it would on a Windows PC. What changes is how the pick itself is made, because each system has its own rules about who may look at the screen.
This article explains those differences, so you know what to expect before you start.
The same window everywhere
Whichever system you use, the main window lists the colour as HEX, short hex, RGB, RGB percent, RGB 0 to 1, HSL, HSV, CMYK, CIE L*a*b*, decimal and COLORREF, each with a Copy button, plus Copy all. You get the nearest CSS colour name with its colour difference, the WCAG luminance and contrast against white and black, the shades and complement, and your recent colours. You can also type or paste a colour into the HEX box to convert it without picking anything.
That consistency is the point. If you work across machines, or share colours with people on other systems, the numbers line up.
On a Mac: the system's own sampler
On macOS, Colour hands the pick to the Mac's own colour sampler. The practical gain is that no Screen Recording permission is needed. Apps that capture the screen themselves usually have to ask for that permission in System Settings, and plenty of people would rather not give it to a small utility. Using the system sampler sidesteps the question entirely.
There is one trade off. Because the pick goes through macOS rather than through Colour's own frozen picture, the zoom view in the main window can't fine-tune a pick on a Mac. If you land a pixel off, pick again rather than nudging. On small details, zoom in during the pick so the right pixel is easy to hit.
On Linux: X11 or Wayland
Linux desktops come in two broad kinds, and Colour handles each in the way that works there. On an X11 session, Colour uses its own frozen-screen magnifier, the same idea as on Windows: the screen is held still while you aim, so nothing moves under the pointer as you zoom in.
Wayland sessions are stricter about screen access by design, so ordinary apps can't simply read the whole screen. There, Colour uses the desktop's own picker. How that picker looks depends on your desktop, but the colour it returns goes into Colour's window and you get every value from it as usual.
If you're not sure which kind of session you're running, your desktop's settings or its about screen will usually say. Picking will work either way, just through a different route.
Choosing the right version
On Windows, Colour is one small exe of about 230 KB with nothing to install, running on the .NET Framework 4.8 built into Windows 10 and 11, with the frozen-screen magnifier and zoom view fine-tuning working on every monitor. On a Mac or Linux machine you get the same values and the same window, with the pick made in whichever way that system allows. If you use more than one system, nothing stops you keeping Colour on each of them and moving between them without relearning anything.
Every version is free software, works offline and needs no account, so you can keep it on each machine you use without signing in to anything.

