
Scanning a drive or folder in Disk Sort by Zaweba
Start a scan in Disk Sort by Zaweba from the drive strip or Scan this folder, then read sizes in the tree, rescan with Ctrl+F5 and refresh with F5.
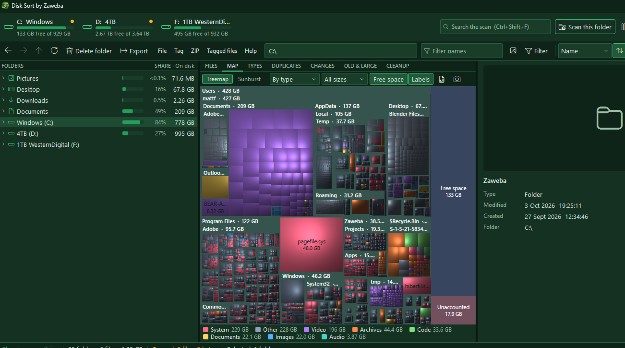
Every job in Disk Sort by Zaweba that involves space starts with a scan. The scan reads a drive or a folder, adds up what each folder holds and lays those sizes over the folder tree, so you can see at a glance where the space has gone. It's quick to start and you can run it again whenever things change.
The folder tree works before you scan anything. You can browse, view photos and sort files straight away. Scanning adds a layer of size information on top.
Starting a scan
There are two ways in. Click a drive in the strip along the top of the window to scan the whole drive, or open the folder you care about and choose Scan this folder (Ctrl+O). Scanning a single folder is faster and is often all you need, for example when Pictures or Downloads is the obvious suspect.
The right-click menu on a folder has two more choices. Open without scanning simply goes to the folder, and Open and scan goes there and scans it in one step.
Once the scan finishes, each scanned folder in the tree shows a size bar, its share of the parent folder and its size. The biggest folders stand out at once, and the MAP tab can show the same scan as a treemap or sunburst.
The standard scan
The standard scan works on any file system and doesn't need administrator rights. It reads folders in parallel, which keeps it brisk on modern drives. That makes it the right choice for USB sticks, memory cards, network shares and any drive where you just want an answer without fuss.
On a local NTFS drive, Disk Sort can do a faster scan when it runs as administrator, but that's a separate tool. The standard scan is always there when you aren't running that way.
Rescanning and refreshing
Files change while you work. Two keys keep the sizes honest. F5 refreshes the folder you're in, which is ideal after you've deleted or moved a few things and want to see the new totals. Ctrl+F5 rescans everything, which is better after a big clear out or when lots has changed elsewhere on the drive.
After each full scan, Disk Sort saves a snapshot of folder totals. That's what the CHANGES tab and the map's growth colouring compare against next time, so scanning the same drive now and again gives you a history of what has grown.
Size or size on disk
Sizes can be shown in two ways, and F4 switches between them. Size is the total of the files' own lengths. Size on disk is the space they actually take up on the drive, which can differ, because drives store files in fixed blocks and some files are compressed. When you're trying to free space, size on disk is the more honest figure. When you're judging how big a set of files is to copy or send, plain size is the one to look at.
Junctions and links
Windows uses junctions and links so that one folder can point at another. By default it's sensible not to follow them, or the same files can be counted twice. If you do want Disk Sort to follow junctions and links, there's an option for it.
Habits that help
Scan the drive that's actually full. If C is the problem, scanning an external drive won't tell you anything. Start with the whole drive, find the big branch in the tree, then do the detailed work there.
Rescan after big changes rather than trusting old numbers. A tree that still shows a folder you emptied an hour ago can send you hunting for space that's already free.
Once you've found the culprit, the rest of Disk Sort is a click away: duplicates, old and large files, cleanup suggestions, and the photo tools for working through a huge picture folder.

